photo header.jpg photo 1-home.jpg photo 2-about.jpg photo 3-contact.jpg photo 4-blogroll.jpg photo 2-2.jpg
Showing posts with label baking. Show all posts

Wednesday, 17 September 2014

Healthy Granola Bars


I haven't posted anything on here in a while, let alone a recipe post but here you go! Quite a bit different than my usual sugar-laden, super sweet desserts but still very tasty - granola bars! These are absolutely packed with plenty of good-for-you ingredients and are addicting to snack on. They come together quite quickly and make the perfect snack. I got the recipe from aunt but made a few minor changes. You can totally customize the bars to fit your preference - add whatever nuts or seeds you prefer or add in dried fruit or dark chocolate. Whatever! Here's what I did:

Ingredients -
2 Cups Oats
1 Cup Roughly Chopped Almonds
1 Cup Shredded Unsweetened Coconut
1/4 Cup Raw Sunflower Seeds
1/4 Cup Raw Pumpkin Seeds
1/4 Cup Chopped Walnuts
1/4 Cup Chopped Pistachios
1/4 Cup Chia Seeds
3 TBSP Coconut Oil
1/2 Cup Raw Honey
Just Shy 1/4 Cup Coconut Sugar
1 TSP Ground Cinnamon
3/4 Cup Puffed Rice
1/4 Cup Hemp Hearts

Method -

1 - Preheat your oven to 350 degrees Fahrenheit. On a baking tray combine oats, almonds, shredded coconut, sunflower and pumpkin seeds, walnuts and pistachios. Bake in oven for 10-15 minutes or until oats and coconut are golden brown. Reduce oven temperature to 300 degrees Fahrenheit. Transfer to a large mixing bowl and add chia seeds.
2 - In a saucepan on medium heat, combine coconut oil, honey and coconut sugar. Bring to a boil and stir until all ingredients are combined.
3 - Pour over the oats mixture. Add in your cinnamon, puffed rice and hemp hearts. If you are using dried fruit or any additional ingredients, add them in now. Mix until everything comes together.
4 - On a baking tray lined with parchment paper, pour the mixture out. Wet your hands to prevent mixture from sticking, and flatten out until about 1.5 cm thick. Bake for 20-25 minutes.
5 - Once out of the oven, set the baking tray on a cooling rack until the granola is slightly warm and firm. Transfer to a cutting board and cut into however wide and long you would like your pieces to be. Keep any crumbs or pieces that break off when you're cutting and use them to sprinkle over yogurt or cereal. Store bars in an airtight container.

Easy peasy! Enjoy! x


 photo sig.jpg

Monday, 28 July 2014

Plum Cake


Hello! I thought I would take a break in-between my travel diary posts to give you my favourite recipe of the moment - super delicious plum cake! My mother grabbed this recipe from an issue of Martha Stewart Living a few years back and it's a real gem. I don't know about you but usually when I try one of Martha Stewarts recipes things do not go well. I truly think Martha leaves important instructions/ingredients out of her recipes just so no one can ever truly recreate her masterpieces (I have a love/hate relationship with her). Anyways, this is the one Martha Stewart recipe I've tried that always goes over very well. The cake is soft and sweet with a crunchy outer layer with thinly sliced plums fanned over top. One great thing about this recipe is that you can go ahead and top it with whatever fruit you have laying about. I've tried with plums, nectarines and cherries and they all came out great. I can't wait for Autumn so I could try a version with apples or pears. So exciting!

Martha Stewart's Plum Cake -

Ingredients:
4 TBSP unsalted butter, room temperature + more for the pan
1 cup all-purpose flour + more for the pan
1/2 TSP baking powder
1/4 TSP baking soda
1/2 TSP coarse salt
3/4 sugar + more for sprinkling over top
1 large egg
1/2 cup butter milk (or 1/2 cup milk with 1/2 TBSP white vinegar mixed in - sit for 10 minutes)
2-3 ripe plums (or whatever fruits you have on hand), thinly sliced

Method:
1 - Preheat your oven to 350 degrees. Butter a 8-9 inch cake pan and dust with flour. Tap out any excess.
2 - Whisk together your dry ingredients in a medium sized bowl. Using your electric mixer on medium speed, cream together your butter and sugar until pale and fluffy. Beat in the egg. In three additions add in your dry ingredients mixture, alternating with your buttermilk.
3 - Pour your batter into the prepared cake pan and smooth the top over with an offset spatula or a knife. Fan your thinly sliced plums (or whatever fruit you have) over top and sprinkle with sugar.
4 - Pop your pan in the oven of 35-40 minutes or until golden brown and an inserted toothpick comes out clean. Let cool and enjoy!

Thank you for reading! x

 photo sig.jpg

Thursday, 1 May 2014

Scones and Lemon Curd


It was a very dreary and drizzly morning so I thought I would brighten the day up and try my hand at baking some scones. What goes well with scones? Quite a few things do, but lemon curd trumps every other spread in my opinion. The recipe for the lemon curd comes from Ina Garten and you can find it online over here. It was so easy and relatively quick to make and I am having the hardest time trying to resist eating spoonfuls of the stuff. The recipe states it will take about ten minutes for the mixture to thicken, but it took me a little longer. Other than that, everything else went very well.
I found this recipe for the scones and changed it up very slightly. The final product was a perfectly flaky and buttery scone that pairs so well with the lemon curd and of course, a cuppa.

Scones -
Yield: 8 Scones

Ingredients:
1 3/4 Cups All Purpose Flour
3 Tsp Baking Powder
1/4 Cup Sugar, plus more for sprinkling
1/8 Tsp Salt
5 Tbsp Cold Butter, cut into chunks
1/2 Cup Milk, plus 1 Tbsp for brushing over top
1/4 Cup Sour Cream

Method:
1  - Preheat your oven to 400 degrees Fahrenheit. Sift your dry ingredients into a large bowl and cut in the cold butter using a pastry cutter. Mix together your milk and sour cream in a separate bowl. Add to the dry ingredients and stir gently until well mixed.
2 - Dust flour over your work surface and your hands. Turn dough out onto the floured surface and form into a ball. Gently flatten it slightly and cut into 8 triangular pieces. 
3 - Place your scones onto a baking sheet lined with parchment paper. Brush milk over the tops and sprinkle with sugar. Bake for 10-15 minutes, or until the tops are golden brown. 
4 - Serve warm with a very generous helping of lemon curd and a cup of your best tea.

Also!!!!! I am so excited to say that I'll be visiting England very soon! I have never been and it has always been the one place I've always wanted to travel to. I'm not quite sure how, but I am so in love with a place I have never been. I guess you can say I'm a bit of an anglophile. Anyway, if you have any suggestions of places to visit while I am there that would be lovely. I'll also be in Austria (Vienna + Salzburg), Germany (Munich) and France (Paris). Any recommendations you may have would be very much appreciated.

As always, thank you for taking the time to read! 
Much love! xxx

 photo sig.jpg

Monday, 10 February 2014

Baking | Valentine's Day Donuts ♡


I think Valentine's Day is one of my favourite days of the year. I am such a sucker for anything pink, heart-shaped or chocolatey. I also love to bake for Valentine's day, so as the big day quickly approaches I got into the kitchen and started baking. I found the recipe for these baked donuts in the February issue of Chatelaine magazine. You can find the recipe online here. Strangely, I don't own any plain round cookie cutters (note to self: buy some asap!) so I went down the untraditional route of square donuts.  
This recipe is great because they are baked, no deep-fryer needed. The taste was pretty good, though a bit bland. I think they would have been better if I had made the donuts (or the glaze) a different flavour. Though, they were still quite nice! After the donuts were completely cooled, I dipped the tops in the glaze and let that dry and then dipped them again. You don't need to do this, but I wanted a more opaque look for the glaze. Then I topped them with some festive sprinkles and voila!! Adorable Valentine's day donuts!


 photo sig.jpg

Monday, 23 December 2013

Baking | Whipped Shortbread


Where did December go? Tomorrow is already Christmas Eve, this month has really flown by! I'm sharing with you the recipe for one of my favourite Christmas cookies - whipped shortbread! They really are quick and easy to make so if you have left all of your Christmas baking to the last minute these will be perfect for you!

Whipped Shortbread:

Ingredients:
2 Cups Butter
1 Cup Sugar
3 Cups All Purpose Flour
1/2 Cup Cornstarch
Sprinkles to Decorate

Instructions:
1 - Preheat your oven to 375 degrees. Line cookie trays with parchment paper.
2 - In the bowl of your stand mixer, beat butter and sugar until light and fluffy.
3 - In a small separate bowl, combine flour and cornstarch. Slowly add to butter and sugar mixer. Mix until well combined. 
4 - Drop cookie dough onto lined cookie trays. I used a 1.5 inch ice cream scoop. You could make them smaller or larger if you like.
5 - Decorate the tops of your cookies with sprinkles or crushed candy cane. 
6 - Bake in the oven for 12 minutes. Be sure to adjust the time if you are making larger or smaller cookies.

These cookies are best served the next day.

Thanks for reading everyone! Happy Holidays!


 photo sig.jpg

Friday, 15 November 2013

Baking | Apple Cinnamon Cupcakes + Cream Cheese Frosting


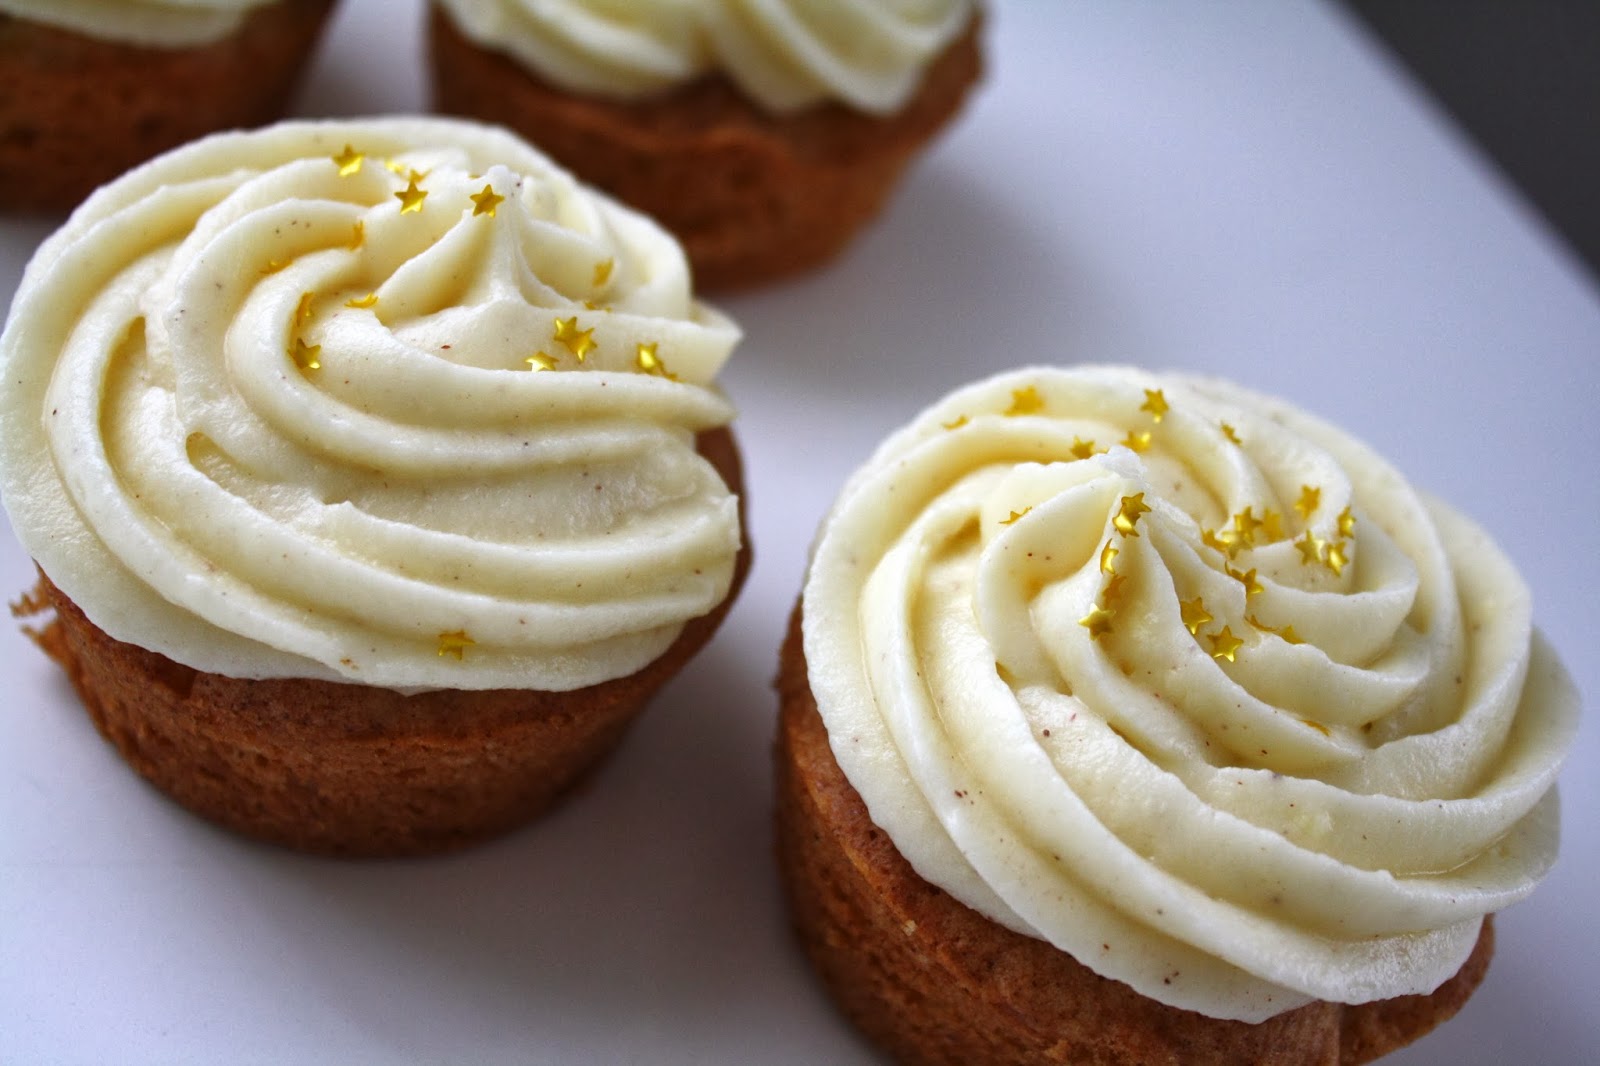
Hi everyone! I come baring the most delicious recipe for you all to enjoy! These apple cinnamon cupcakes are perfect for the last few weeks of Autumn or as an alternative (or as an additional dessert!!) to apple pie this Thanksgiving for all my American pals! These cupcakes are packed with grated granny smith apples and topped with a cinnamon spiked cream cheese frosting (and edible gold stars!)

I adapted this recipe slightly from Tracey's Culinary Adventures. I have baked these cupcakes twice now and they've been a success each time. The recipe is really easy to follow and does not take too long to put together.

Apple Cinnamon Cupcakes:
Yield: 24 Cupcakes

Ingredients - 

2 1/2 Cups All-Purpose Flour
4 Tsp Baking Powder
1 Tsp Cinnamon
1 Tsp Salt
4 Eggs, Room Temperature
1 Cup Light Brown Sugar
1 Cup Granulated Sugar
1 Cup Canola Oil
4 Tsp Real Maple Syrup
4 Granny Smith Apples, Peeled, Cores and Shredded

Instructions -

1 - Preheat your oven to 350 degrees. Line your cupcake pans with cupcake liners or grease the cups.
2 - Whisk together your flour, baking power, cinnamon and salt in a medium bowl. Set aside.
3 - In the bowl of your stand mixer with the whisk attachment, whisk together the eggs and both sugars. Be sure to break down any brown sugar clumps.
4 - Add in the oil and maple syrup and continue mixing until fully incorporated.
5 - Add your dry ingredients with the wet and mix until combined and fold in the shredded apples.
6 - Divide the batter evenly in your cupcake tins and fill each cup 2/3 full.
7 - Bake cupcake in the oven for 18-24 minutes or until a toothpick inserted into the largest cupcake comes out clean.


Cinnamon Cream Cheese Frosting -

Ingredients:

1 Cup Unsalted Butter, Room Temperature
1 Cup Cream Cheese, Room Temperature
5 Cups Icing Sugar 
1/2 Tsp Cinnamon
2 Tbsp Maple Syrup

Instructions:

1 - In the bowl of your stand mixer, cream together the butter and cream cheese on medium-high speed until light, fluffy and well combined.
2 - Turn the mixer down and add in the icing sugar and mix until it is all incorporated. Be sure to scrape down the bowl when necessary. 
3 - Add in the cinnamon and maple syrup and mix on high speed until light and fluffy.


Don't forget to top with some adorable golden stars! 

Enjoy!


 photo sig.jpg

Thursday, 7 November 2013

Baking | Reese's Puffs Cereal Squares


Before I begin, let me first apologize for my lack of posts over the last few weeks. Oops! I have recently started a new job and was not able to find the time (or inspiration) to write any blog posts. With that said, let's get started!

Lately I've been having a real craving for Rice Krispies squares and Reese's Puffs cereal. So here is a combination of the two. There is not any real baking involved which makes these super quick and easy to make, though quite a bit sticky! You can use any cereal that you like. I believe grocery stores have started to carry the red and green Rice Krispies for Christmas!!!! This makes me super excited and I'll definitely have to whip up some festive squares soon!


Reese's Puffs Cereal Squares -

Ingredients:
400g Mini Marshmallows
1/4 Cup Butter
9 to 10 Cups Reese's Puffs cereal (or a cereal of your choice)

Instructions:
1 - Add your marshmallows and butter to a large microwavable bowl. Put in your microwave for two to three minutes. Mix well.
2 - Stir in your cereal. Mix well to coat the cereal evenly in the marshmallow mixture. 
3 - Pour mixture into a greased pan.
4 - When ready to serve, cut into squares and enjoy!


Once again I apologize for being so inactive lately. I'll definitely be posting more and soon I'll be writing some Holiday related posts! Stay tuned! Thanks for stopping by! x

 photo sig.jpg

Sunday, 6 October 2013

Baking | Gingersnap Cookies


In my house gingersnap cookies are most commonly baked (and eaten) during Christmas time. While these cookies were being baked in the oven my entire house filled up with a smell reminiscent of Christmas. I know, I know. I'm about two months too early. However, the spicy flavour of these cookies make them perfectly suitable for the Autumn months as well. These cookies are soft and chewy and just so delicious!

The recipe I used comes from the October issues of Canada's Style at Home magazine. According the the magazine this recipe makes two dozen cookies, but I was able to make thirty-eight nice sized cookies. I have also altered the recipe slightly by using a bit less butter (by accident!) but they turned out perfectly fine!


Gingersnap Cookies -
Yield: 24-38 Cookies

Ingredients:
4 Cups All-Purpose Flour
2 1/2 Tsp Baking Soda
2 Tsp Ground Ginger
1 Tsp Cinnamon
1/2 Tsp Ground Cloves
1/2 Tsp Salt
3/4 Cup Room Temperature Unsalted Butter (I used 1/2 Cup instead)
2 Cups Granulated Sugar, Plus More for Coating
3 Large Eggs
1/2 Cup Fancy Molasses
1 Tsp Pure Vanilla Extract

Instructions: 
1 - Preheat your oven to 350 degrees Fahrenheit and line your cookie sheets with parchment paper or lightly grease them.
2 - In a large bowl, sift together your flour, baking soda, ginger, cinnamon, cloves and salt; set aside. 
3 - In the bowl of your stand mixer using the paddle attachment, cream together the butter and sugar until light and fluffy on medium-high speed. Be sure to scrape down the sides of the bowl.
4 - Add in the eggs one at a time, briefly beating between each addition. Scrape down the sides of the bowl.
5 - Add in the molasses and vanilla. Mix on high speed until the molasses and vanilla are well combined and the batter is light brown in colour. Scrape down the sides of the bowl again.
6 - With the mixer on low speed, add in the dry ingredients and mix until fully combined. 
7 - Fill a small bowl with about a 1/2 cup of sugar. Use an ice cream scoop to drop out equally sized portions of cookie dough into the sugar one at a time. Roll the ball of dough around in the sugar until coated. Repeat with remaining dough, placing the cookies onto the baking sheet 1 1/2" apart. 
8 - Gently press down on the balls of dough with the palm of your hand to slightly flatten the cookie.
9 - Bake for 15-17 minutes or until the cookies are firm around the edges but still slightly soft in the centre. Remove from the oven and transfer cookies onto a rack to cool. 


I hope you all had a great weekend! x


 photo sig.jpg

Tuesday, 24 September 2013

Baking | Pumpkin Doughnut Muffins


Happy Autumn everyone! Autumn is my absolute favourite time of the year and I'm so excited to start bringing you guys lots and lots of Autumn-related posts! So, I'm going to start things off with this amazing recipe for pumpkin doughnut muffins! I've made about five batches of these within the last two weeks, they are that great! And they are perfect warmed up and eaten for breakfast or with a cup of  tea at the end of the day.


The recipe comes from Framed Cooks and it is really easy to follow. It is a bit time consuming and messy, especially when you have to brush the muffins with butter and roll in cinnamon sugar. If you don't have the patience and don't want to make as big of a mess you could always bake these in cupcake liners and only cover the tops with the sugar mixture. They still come out great and really taste like doughnuts. If you don't serve them right away, I really suggest popping them in the microwave for about ten to fifteen seconds before eating, it really makes all the difference. 

I also recommend doubling the batch, or even tripling. The recipe yields twelve muffins but in my experience, that is not nearly enough to satisfy me and my family. So keep that in mind! Any left over pumpkin puree you have you can just pop into a Ziploc bag and store in the freezer to use at a later date.


The final result is a soft, tender muffin with spicy, pumpkin flavour. The cinnamon sugar coating is an absolute must and really takes these muffins to the next level. When eaten warm the flavour is comparable to cinnamon sugar doughnuts (the best taste in the world!!). 

Let me know if you are planning to whip up a batch of these guys or tell me some of your favourite Autumn recipes! Thank you for reading and look forward to some more Autumn related posts coming soon! xx


 photo sig.jpg

Saturday, 7 September 2013

Baking | Raspberry Filled Cupcakes + White Chocolate Buttercream


About a week ago my sister asked me if I would bake her some cupcakes for her and her friends for a get together. I happily agreed and immediately started searching on interest for something sweet to bake. I knew I wanted to use some sort of fruit filling for the cupcakes, so I decided on raspberries. Since I love the combination of white chocolate and raspberries, I thought a white chocolate buttercream would go great on top.

For the cupcake itself I used this white cake recipe from Add a Pinch. I really liked how the cupcakes turned out and they tasted very delicious. The cake was moist and really tender. This is definitely my go-to white cake recipe now. 


Raspberry Filling -

Ingredients:
2 Cups Chopped Raspberries
1/2 Cup Granulated Sugar
2 Tbsp Cornstarch

Instructions:
1 - Add your raspberries to a small sauce pan over medium heat. Continuously stir until the raspberries begin to soften and juices are released.
2 - Add in both your sugar and cornstarch. This will cause the raspberries to thicken. Mix until all ingredients are well incorporated.
3 - Remove from heat and let the mixture cool before you begin to fill your cupcakes.


White Chocolate Buttercream Frosting -

Ingredients:
1 Cup Room Temperature Butter
3 Cups Icing Sugar
6 oz White Chocolate (Not Chips), melted
2 Tbsp Milk
2 Tsp Vanilla

Instructions:
1 - Place all ingredients in the bowl of an electric mixer. Beat on medium speed until smooth, about three minutes.


The cupcakes are sweet, but not overly so. These were quite easy to make, just a bit time consuming. I think another great idea would be to use a strawberry filling with milk chocolate buttercream on top. It would be a great idea come Valentine's Day!

Thank you for reading! xx


 photo sig.jpg

Friday, 23 August 2013

Baking | Rosemary + Sea Salt Focaccia w/ Olive Tapenade


Hi everyone! Today I've got a super easy recipe for delicious focaccia bread. In this recipe, I've topped my focaccia with fresh rosemary from my yard and sea salt. You can top yours with sun dried tomatoes, olives, sliced potato, fresh herbs, the options are endless. I used this recipe from a Spicy Perspective and changed it up slightly. The finished product was great, my whole family enjoyed it and we finished it off in a day. The exterior was hard and crusty and the interior was so soft. Perfect. I cursed myself for not making two loaves. 

I used a 10" round springform pan to bake my bread in. You could use something slightly larger and end with a bread that isn't quite as tall or you could just press your dough out on a flat baking tray and have a more rustic looking loaf. Just be sure to watch it in the oven.


Rosemary + Sea Salt Focaccia -

Ingredients:
1/4 Cup Warm Water
2 Tsp Honey
1 Packet of Dry Active Yeast
1 1/2 Cups Cold Water
3 Tbsp Olive Oil + Extra
1 1/2 Tsp Sea Salt
1/2 Tsp Minced Garlic (or more if you prefer)
4 Cups All Purpose Flour
Salt + Pepper
Rosemary

Instructions:
1- In the bowl of your electric mixer, add your hot water and honey. Dissolve the honey by swirling the bowl around until the water is lukewarm. Add in your packet or dry active yeast and swirl around for about ten seconds. Set your bowl down for about ten minutes to allow the yeast to foam. 
2 - Once the yeast has foamed up a bit (after around ten minutes) add in your cold water, olive oil, salt and garlic. Turn your mixer on low, using the bread hook attachment and slowly add in the flour, scraping down the bowl between additions. Once the flour has all been added, continue mixing the bread on low for ten minutes. 
3 - Pull the dough away from the sides of the bowl to allow for some room to oil the bowls interior. Cover the dough with plastic wrap and let it rise for about two hours. After the dough has risen, turn the mixer back on for about thirty seconds.
4 - Thoroughly oil your baking dish (I used a 10" round springform pan) and press the dough down and spread it out. Once the dough is pressed down, add your toppings (I used rosemary, you could use olives, sun dried tomatoes, etc) and drizzle with olive oil and sprinkle with salt and pepper.
5 - Cover the dough with a damp towel and let it sit for about one hour to rise again. Preheat the oven to 400 degrees and bake for 35-40 minutes and the top is golden-brown. Let the bread cool before removing it from the baking dish and enjoy!

Recipe adapted from A Spicy Perspective 


To accompany the focaccia I also made a simple olive tapenade to spread. If you don't have a food processor you can just finely mince the ingredients and mix together.

Olive Tapenade -

Ingredients:
1/2 Cup Green Olives
1/2 Cup Kalamata Olives
2 Cloves of Garlic
2 Tbsp Olive Oil
1 Tsp Lemon Juice
Black Pepper

Instructions:
1 - Add all the ingredients into a food processor and turn on for a few seconds. Be careful not to leave it on for too long, the tapenade should not be smooth but rather chunky. Store covered in your refrigerator until ready to use.


Thank you for reading this post! I hope some of you will try this recipe out as it is so tasty and pretty simple!

Also, be sure to follow me on Bloglovin'!


 photo sig.jpg

Monday, 19 August 2013

Weekend Catchup | Cookies


This week in class we made sugar cookies to decorate. I used modelling chocolate and fondant to decorate these guys and silicone moulds to create the flowers. The cuts on the fondant/chocolate aren't the cleanest or neatest, but I think they look pretty cute. The cookies themselves are really tasty with a hint of lemon flavour thanks to some lemon zest. I think it's great to have a go-to simple, fool-proof sugar cookie recipe, so maybe I'll do a blog post one day soon with the recipe!

Hope you all had a wonderful weekend!


 photo sig.jpg

Saturday, 10 August 2013

Baking | Strawberry Loaf


Todays incredibly delicious dessert comes from a recipe I found on Pixels + Crumbs and can be found here. I went to the St. Lawrence Market this morning and picked up two baskets of fresh Ontario strawberries to use in this recipe. The recipe was easy to follow and came out with great results. The loaf was very moist and cake-like with great strawberry flavour. It has a very similar texture to the muffins I made and blogged about here.  

My only (minor) issue with this recipe was the cooking time. The recipes asks you to bake in the oven for 50-60 minutes or until a toothpick inserted comes out clean. After sixty minutes my loaf was still very wet inside and had to go in for longer, but the strawberries on top were already starting to brown. So after an additional ten minutes in the oven, some berries got slightly burnt!

Other than that, this cake came out really nicely and it tastes great as well! I'd definitely recommend you give it a try!


 photo sig.jpg

 photo blogby.jpg